In this sample example we will be creating the stateless ejb with glasshfish and ant. Using ant is optional as it will automate the build on basis of the script.
Prerequisite:
We won't go in setting the path for anything. We will be using the bin folder to run. But yes for easy build, path can be set. The path can be set for glassfish and ant in following ways.
Bingo! We are done for making the sample application.
Lets create HelloWorld Application. We need three java file Hello.java, HelloLocal.java, HelloBean.java and one xml file i.e. build.xml. We will create the package com.asb. Our directory structure will look like
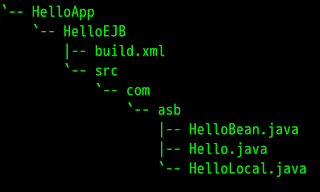
This structure can exist in any drive or directory.
Code for the files
----------
Hello.java
----------
---------------
HelloLocal.java
---------------
HelloBean.java
--------------
---------
build.xml
---------
To build using ant we will go to bin directory where the ant was extracted.
ant/bin>./ant compile -buildfile <path to helloapp>/HelloEJB/build.xml -lib <path to glassfish>/lib/javaee.jar
ant/bin>./ant dist -buildfile <path to helloapp>/HelloEJB/build.xml -lib <path to glassfish>/lib/javaee.jar
glassfish/bin>./asadmin start-domainglassfish/bin>./asadmin deploy <path to="" helloapp>/HelloEJB/dist/lib/HelloBean-<date>.jar
We are done with the deployment.
To run we need client program
To compile and run
javac -cp <path to glassfish>/lib/javaee.jar:. HelloClient.java
java -cp <path to glassfish>/lib/javaee.jar:<path to glassfish>/lib/appserv-rt.jar HelloClient
We are done we will get the output HelloWorld.
Prerequisite:
- GlassFish version 3.1 [i am using zip format]. Click to download
- Apache-ant version 1.8.2 [i am using .tar.gz format ]. Click to download
- Java up and running [ JDK ]
We won't go in setting the path for anything. We will be using the bin folder to run. But yes for easy build, path can be set. The path can be set for glassfish and ant in following ways.
- For GlassFish : GLASSFISH_HOME=<absolute path of glassfish>/bin
- For ant : ANT_HOME=<absolutepath of ant >/bin

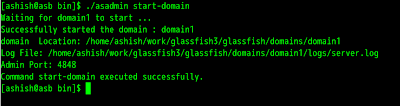
terminal screen to run glassfish
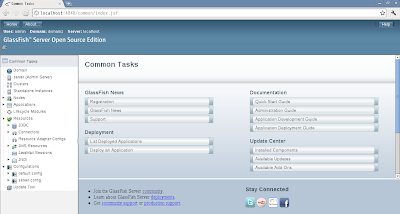
To test administrative console open the browser with url http://localhost:4848. We will get
To test administrative console open the browser with url http://localhost:4848. We will get

Bingo! We are done for making the sample application.
Lets create HelloWorld Application. We need three java file Hello.java, HelloLocal.java, HelloBean.java and one xml file i.e. build.xml. We will create the package com.asb. Our directory structure will look like

This structure can exist in any drive or directory.
Code for the files
----------
Hello.java
----------
package com.asb;
public interface Hello
{
    public String sayHello();
    public String sayHelloRemote();
}
---------------
HelloLocal.java
---------------
package com.asb;
public interface HelloLocal
{
    public String sayHello();
    public String sayHelloLocal();
}
--------------HelloBean.java
--------------
package com.asb;
import javax.ejb.Stateless;
import javax.ejb.Remote;
import javax.ejb.Local;

@Stateless
@Remote(Hello.class)
@Local(HelloLocal.class)
public class HelloBean implements Hello,HelloLocal
{
    public String sayHello()
    {
        return "Hello World";
    }
    public String sayHelloLocal()
    {
        return "Hello Local World";
    }
    public String sayHelloRemote()
    {
       return "Hello Remote World";
    }
}
---------
build.xml
---------
<project name="HelloEJB" basedir=".">
    <description>
         Simple Build File
    </description>
    <!-- set global properties for this build -->
    <property name="src.dir" location="src"/>
    <property name="build.dir" location="build"/>
    <property name="dist.dir" location="dist"/>

    <target name="init">
        <!-- For timeStamp -->
        <tstamp/>
        <mkdir dir="${build.dir}"/>
    </target>

    <target name="compile" depends="init">
        <javac srcdir="${src.dir}" destdir="${build.dir}" includeantruntime="true"/>
    </target>

    <target name="dist" depends="compile">
        <mkdir dir="${dist.dir}/lib"/>
        <jar jarfile="${dist.dir}/lib/HelloBean-${DSTAMP}.jar" basedir="${build.dir}"/>
    </target>

    <target name="clean">
        <delete dir="${build.dir}"/>
        <delete dir="${dist.dir}"/>
    </target>
</project>
To build using ant we will go to bin directory where the ant was extracted.
ant/bin>./ant compile -buildfile <path to helloapp>/HelloEJB/build.xml -lib <path to glassfish>/lib/javaee.jar
ant/bin>./ant dist -buildfile <path to helloapp>/HelloEJB/build.xml -lib <path to glassfish>/lib/javaee.jar
glassfish/bin>./asadmin start-domainglassfish/bin>./asadmin deploy <path to="" helloapp>/HelloEJB/dist/lib/HelloBean-<date>.jar
We are done with the deployment.
To run we need client program
package com.asb.client;

import javax.naming.*;
import com.asb.Hello;

public class HelloClient
{
    public static void main(String args[])
    {
        try
        {
            InitialContext ctx = new InitialContext();
            Hello h = (Hello) ctx.lookup("com.asb.Hello");
            System.out.println(h.sayHello());
            System.out.println(h.sayHelloRemote());
        }
        catch(Exception e)
        {
            e.printStackTrace();
        }
    }
}
To compile and run
javac -cp <path to glassfish>/lib/javaee.jar:. HelloClient.java
java -cp <path to glassfish>/lib/javaee.jar:<path to glassfish>/lib/appserv-rt.jar HelloClient
We are done we will get the output HelloWorld.


