We always study HTTP details when ever we are learning any server base language. HTTP details includes about the HTTP request and HTTP response. Following video shows how we can monitor HTTP headers using Fire fox addons.
Share Discuss Grow
Tuesday, February 19, 2013
Saturday, February 16, 2013
Hello Friends, I have started posting videos on various topics on you tube. The video are created for helping the students and learners. If you want any help you can connect to me using email [ast.bhatia@gmail.com ].
https://www.youtube.com/profashish
https://www.youtube.com/profashish
Friday, September 21, 2012
File IO in java.
Added a PPT for File handling in java in two parts yet more to come. The content is for the educational purpose only. Material have been taken from book, internet with no intention of breaking any rights issues.
Sunday, June 19, 2011
Creating Stateless EJB with GlassFish
In this sample example we will be creating the stateless ejb with glasshfish and ant. Using ant is optional as it will automate the build on basis of the script.
Prerequisite:
We won't go in setting the path for anything. We will be using the bin folder to run. But yes for easy build, path can be set. The path can be set for glassfish and ant in following ways.


Bingo! We are done for making the sample application.
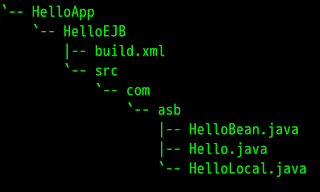
Lets create HelloWorld Application. We need three java file Hello.java, HelloLocal.java, HelloBean.java and one xml file i.e. build.xml. We will create the package com.asb. Our directory structure will look like

This structure can exist in any drive or directory.
Code for the files
----------
Hello.java
----------
---------------
HelloLocal.java
---------------
HelloBean.java
--------------
---------
build.xml
---------
To build using ant we will go to bin directory where the ant was extracted.
ant/bin>./ant compile -buildfile <path to helloapp>/HelloEJB/build.xml -lib <path to glassfish>/lib/javaee.jar
ant/bin>./ant dist -buildfile <path to helloapp>/HelloEJB/build.xml -lib <path to glassfish>/lib/javaee.jar
glassfish/bin>./asadmin start-domainglassfish/bin>./asadmin deploy <path to="" helloapp>/HelloEJB/dist/lib/HelloBean-<date>.jar
We are done with the deployment.
To run we need client program
To compile and run
javac -cp <path to glassfish>/lib/javaee.jar:. HelloClient.java
java -cp <path to glassfish>/lib/javaee.jar:<path to glassfish>/lib/appserv-rt.jar HelloClient
We are done we will get the output HelloWorld.
Prerequisite:
- GlassFish version 3.1 [i am using zip format]. Click to download
- Apache-ant version 1.8.2 [i am using .tar.gz format ]. Click to download
- Java up and running [ JDK ]
We won't go in setting the path for anything. We will be using the bin folder to run. But yes for easy build, path can be set. The path can be set for glassfish and ant in following ways.
- For GlassFish : GLASSFISH_HOME=<absolute path of glassfish>/bin
- For ant : ANT_HOME=<absolutepath of ant >/bin

terminal screen to run glassfish
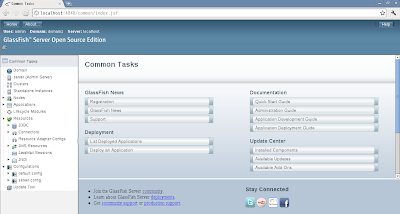
To test administrative console open the browser with url http://localhost:4848. We will get
To test administrative console open the browser with url http://localhost:4848. We will get

Bingo! We are done for making the sample application.
Lets create HelloWorld Application. We need three java file Hello.java, HelloLocal.java, HelloBean.java and one xml file i.e. build.xml. We will create the package com.asb. Our directory structure will look like

This structure can exist in any drive or directory.
Code for the files
----------
Hello.java
----------
package com.asb;
public interface Hello
{
    public String sayHello();
    public String sayHelloRemote();
}
---------------
HelloLocal.java
---------------
package com.asb;
public interface HelloLocal
{
    public String sayHello();
    public String sayHelloLocal();
}
--------------HelloBean.java
--------------
package com.asb;
import javax.ejb.Stateless;
import javax.ejb.Remote;
import javax.ejb.Local;

@Stateless
@Remote(Hello.class)
@Local(HelloLocal.class)
public class HelloBean implements Hello,HelloLocal
{
    public String sayHello()
    {
        return "Hello World";
    }
    public String sayHelloLocal()
    {
        return "Hello Local World";
    }
    public String sayHelloRemote()
    {
       return "Hello Remote World";
    }
}
---------
build.xml
---------
<project name="HelloEJB" basedir=".">
    <description>
         Simple Build File
    </description>
    <!-- set global properties for this build -->
    <property name="src.dir" location="src"/>
    <property name="build.dir" location="build"/>
    <property name="dist.dir" location="dist"/>

    <target name="init">
        <!-- For timeStamp -->
        <tstamp/>
        <mkdir dir="${build.dir}"/>
    </target>

    <target name="compile" depends="init">
        <javac srcdir="${src.dir}" destdir="${build.dir}" includeantruntime="true"/>
    </target>

    <target name="dist" depends="compile">
        <mkdir dir="${dist.dir}/lib"/>
        <jar jarfile="${dist.dir}/lib/HelloBean-${DSTAMP}.jar" basedir="${build.dir}"/>
    </target>

    <target name="clean">
        <delete dir="${build.dir}"/>
        <delete dir="${dist.dir}"/>
    </target>
</project>
To build using ant we will go to bin directory where the ant was extracted.
ant/bin>./ant compile -buildfile <path to helloapp>/HelloEJB/build.xml -lib <path to glassfish>/lib/javaee.jar
ant/bin>./ant dist -buildfile <path to helloapp>/HelloEJB/build.xml -lib <path to glassfish>/lib/javaee.jar
glassfish/bin>./asadmin start-domainglassfish/bin>./asadmin deploy <path to="" helloapp>/HelloEJB/dist/lib/HelloBean-<date>.jar
We are done with the deployment.
To run we need client program
package com.asb.client;

import javax.naming.*;
import com.asb.Hello;

public class HelloClient
{
    public static void main(String args[])
    {
        try
        {
            InitialContext ctx = new InitialContext();
            Hello h = (Hello) ctx.lookup("com.asb.Hello");
            System.out.println(h.sayHello());
            System.out.println(h.sayHelloRemote());
        }
        catch(Exception e)
        {
            e.printStackTrace();
        }
    }
}
To compile and run
javac -cp <path to glassfish>/lib/javaee.jar:. HelloClient.java
java -cp <path to glassfish>/lib/javaee.jar:<path to glassfish>/lib/appserv-rt.jar HelloClient
We are done we will get the output HelloWorld.
Friday, June 10, 2011
Java and MSAccess
A simple video on how to connect MSAcess and Java.
Creating Hello World Servlet
A simple video [ screencast ] to show how to develop the HelloWorld Servlet.
Friday, November 19, 2010
Replacing old *nix with Fedora 14
Last time when i installed fedora am not that happy; the problem may be on my side or on other side; i dont know.
I thought lets give it a try again. I installed fedora 14, installation was smooth but i faced some problem in creating the bootable usb drive. But it got resolved in few tries. I installed fedora and trust me installation was too smooth.
After the installation i need to make it ready for using [ missing softwares ]
I started with Java.
Installing Java
Ok Lets try it out. You may require root access.
Next is openoffice
yum install openoffice*
To enjoy mp3 and other restricted softwares we need to enable the restricted repos.
This is all for Fedora 14.
I thought lets give it a try again. I installed fedora 14, installation was smooth but i faced some problem in creating the bootable usb drive. But it got resolved in few tries. I installed fedora and trust me installation was too smooth.
After the installation i need to make it ready for using [ missing softwares ]
I started with Java.
Installing Java
- Download jdk and jre from goo.gl/nqkjo. Download bin files.
- Change it to become executable [ chmod +x file ]
- Run bin file
- Using alternative --install command.
Ok Lets try it out. You may require root access.
- Open Terminal
- wget goo.gl/JMYjs This will download jdk-6u22-linux-i586-rpm.bin
- chmod +x jdk-6u22-linux-i586-rpm.bin
- ./jdk-6u22-linux-i586-rpm.bin
- alternatives --install /usr/bin/java java /usr/java/jdk1.6.0_22/jre/bin/java 20000
- alternatives --install /usr/bin/javaws javaws /usr/java/jdk1.6.0_22/jre/bin/javaws 20000
- java -version
Next is openoffice
yum install openoffice*
To enjoy mp3 and other restricted softwares we need to enable the restricted repos.
This is all for Fedora 14.
Subscribe to:
Posts (Atom)